


How to Use Animated Elements / Lens Flares & Change the Blend Mode

Using our Animated Elements & Lens Flares
Lens flares & animated elements are the visual equivalent of sound effects for your videos. It's that subtle detail that can really make your footage pop. It's all in the details after all! This is a quick little guide on how you can these effects on your videos. Just follow the simple steps below and you are good to go.
Feel free to roam around our website, where you can check out a variety of Lens Flares & Animated Elements available, expertly developed by our team, simply by clicking this button:
Lens FlaresAnimated ElementsYou can find a variety of creative LUTs available, expertly developed by our professional team of videographers, simply by following this link: View Film LUTs
Mastering Blend Modes
Blend modes are crucial for using lens flares. They basically allow your footage to blend into the clip below in the timeline. Therefore you will need the flare file to be above the footage for example, Footage on track 1 and flare on track 2.
Pretty much all editing software allows blend modes due to how crucial and useful they can be. You can use blend modes to do a wide range of things. They can create some crazy cool effects when experimenting with them.
Using a video with a blending mode is one of the quickest ways to get a unique look. In simple terms, a blending mode tells the software how to interpret the colors and luminance of a video layer. For example, the 'Screen' blending mode will completely remove black pixels in your video, therefore blending the videos.
Animated Elements Confirmed Compatible Software
- Adobe Premiere Pro
- Adobe Premiere Elements
- Adobe After Effects
- Adobe Photoshop CC
- Final Cut Pro X
- DaVinci Resolve
- Filmora
- LumaFusion
- Steamlabs OBS
- OBS Studio
- KineMaster
- + Many more
- iMovie (Computer & iPad)
- Avid
- Edius
- Vegas Pro
- Pinnacle Studio
- Corel
- Movavi
- HitFilm Express
- Video Pad
- ScreenFlow
- Camtasia
Which file type works with my software?
QUICKTIME PRORES + ALPHA
Transparent background underneath animations - Large file size
- Adobe Premiere Pro
- Adobe Premiere Elements
- Adobe After Effects
- Adobe Photoshop CC
- iMovie (Computer & iPad)
- DaVinci Resolve
- Final Cut Pro X
- Filmora
- LumaFusion
- Avid
- Edius
- Movavi
- OBS Studio
- Steamlabs OBS
- HitFilm Express
- Video Pad
- ScreenFlow
- KineMaster
- + Many more
MP4 H264
Need to change the blend mode to 'Screen' to remove background - Small file size
- Adobe Premiere Pro
- Adobe Premiere Elements
- Adobe After Effects
- Adobe Photoshop CC
- DaVinci Resolve
- Final Cut Pro X
- Vegas Pro
- Pinnacle Studio
- Corel
- Filmora
- LumaFusion
- Avid
- Edius
- OBS Studio
- Steamlabs OBS
- HitFilm Express
- Camtasia
- KineMaster
- Power Director
- + Many more
Video tutorial
How to use the Animated Elements in all software. We explain about:
- File types & which ones to use
- How to drag & drop
- Best editing software

Adobe Premiere Pro
Lens Flares:
All you need to do is change the blend mode to 'Screen' to use Lens Flares.
Animated Elements:
We provide two file types with Animated Elements, MP4 H264 & Prores + Alpha.
Using Prores + Alpha:
Just drag & drop the elements into your timeline & that's it.
Using MP4 H264:
All you need to do is change the blend mode to 'Screen' to use our MP4 Animated Elements.
How to change the blend mode:
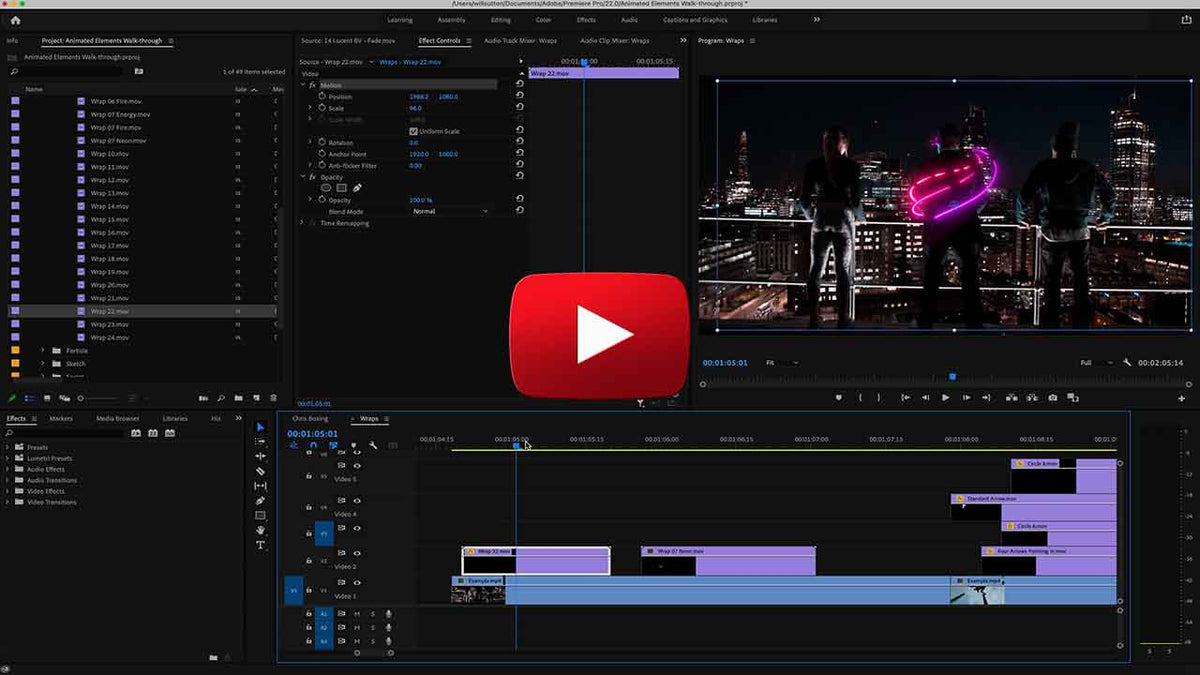
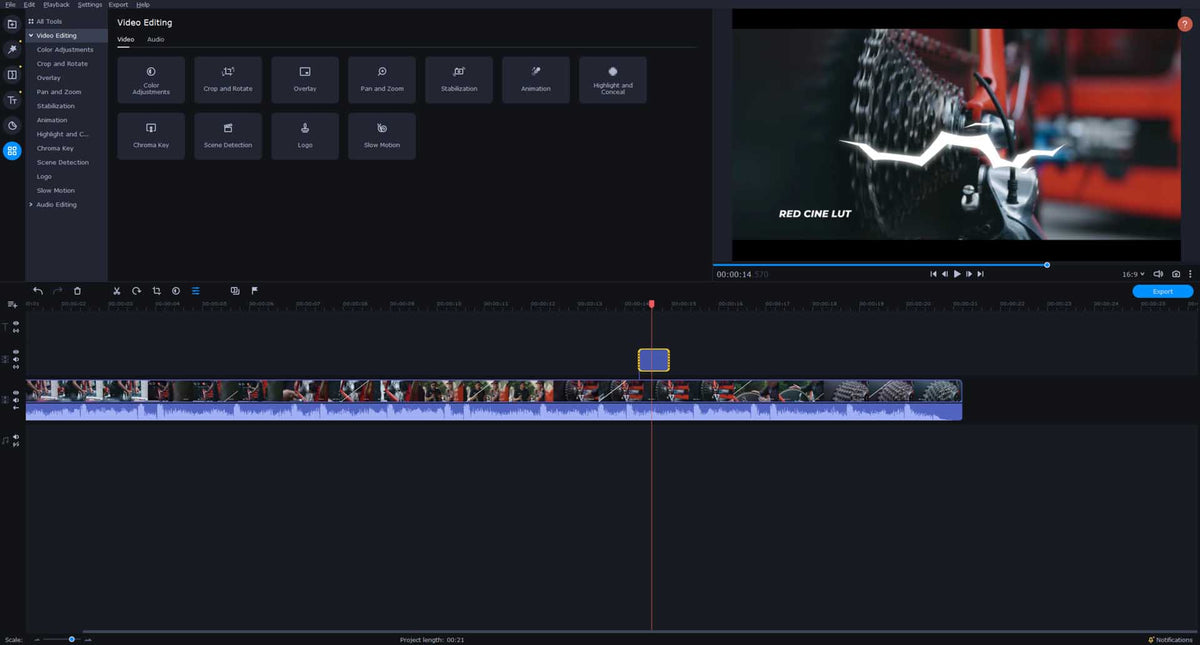
- Open Premiere Pro.
- Import the unzipped Lens Flare or Animated Elements folder into the project.
- Drag a chosen Flare Clip onto 'Track 2' of your timeline (You want to place it above your footage you want to have the Flares on). This effect will only work when the flares are placed above other footage.
- Click on the overlay clip and go to the effects panel.
- Open up the toggle ‘Opacity’.
- Change the ‘Blend Mode’ to ‘Screen’.
Final Cut Pro X
Lens Flares:
All you need to do is change the blend mode to 'Screen' to use Lens Flares.
Animated Elements:
We provide two file types with Animated Elements, MP4 H264 & Prores + Alpha.
Using Prores + Alpha:
Just drag & drop the elements into your timeline & that's it.
Using MP4 H264:
All you need to do is change the blend mode to 'Screen' to use our MP4 Animated Elements.
How to change the blend mode:
- Open Final Cut Pro X.
- Import the unzipped Lens Flare or Animated Elements folder into the project.
- Drag a chosen Flare Clip onto 'Track 2' of your timeline (You want to place it above your footage you want to have the Flares on). This effect will only work when the flares are placed above other footage.
- Click on the Flare Clip and go to the video panel in the top right of the screen. You will see a 'Video' & 'Info' tab, please select the 'Video' tab.
- You will see a 'Compositing' section where you can select your blend mode.
- Change the ‘Blend Mode’ to ‘Screen’.
DaVinci Resolve
Lens Flares:
All you need to do is change the blend mode to 'Screen' to use Lens Flares.
Animated Elements:
We provide two file types with Animated Elements, MP4 H264 & Prores + Alpha.
Using Prores + Alpha:
Just drag & drop the elements into your timeline & that's it.
Using MP4 H264:
All you need to do is change the blend mode to 'Screen' to use our MP4 Animated Elements.
How to change the blend mode:
- Open DaVinci Resolve.
- Import the unzipped Lens Flare or Animated Elements folder into the project.
- Drag a chosen Flare Clip onto 'Track 2' of your timeline (You want to place it above your footage you want to have the Flares on). This effect will only work when the flares are placed above other footage.
- Click on the Flare Clip and go to the panel on the top right of your program. You will see an 'Inspector' tab, please open this.
- You will see a 'Composite' section where you can select your blend mode.
- Change the ‘Blend Mode’ to ‘Screen’.

Filmora
Lens Flares:
All you need to do is change the blend mode to 'Screen' to use Lens Flares.
Animated Elements:
We provide two file types with Animated Elements, MP4 H264 & Prores + Alpha.
Using Prores + Alpha:
Just drag & drop the elements into your timeline & that's it.
Using MP4 H264:
All you need to do is change the blend mode to 'Screen' to use our MP4 Animated Elements.
How to change the blend mode:
- Open Filmora.
- Import the unzipped Lens Flare or Animated Elements folder into the project.
- Drag a chosen Flare Clip onto 'Track 2' of your timeline (You want to place it above your footage you want to have the Flares on). This effect will only work when the flares are placed above other footage.
- Click on the Flare Clip and you will see an icon in the left-centre of Filmora that has 3 horizontal lines. Click this or type hotkey (Alt + E on Windows) (Command + E on Mac). This will open up a video panel in the top left of the program.
- Open up the 'Compositing' section.
- Change the ‘Blend Mode’ to ‘Screen’.

Adobe After Effects CC
Lens Flares:
All you need to do is change the blend mode to 'Screen' to use Lens Flares.
Animated Elements:
We provide two file types with Animated Elements, MP4 H264 & Prores + Alpha.
Using Prores + Alpha:
Just drag & drop the elements into your timeline & that's it.
Using MP4 H264:
All you need to do is change the blend mode to 'Screen' to use our MP4 Animated Elements.
How to change the blend mode:
- Open After Effects.
- Import the unzipped Lens Flare or Animated Elements folder into the project.
- Drag a chosen Flare Clip onto 'Track 2' of your timeline (You want to place it above your footage you want to have the Flares on). This effect will only work when the flares are placed above other footage.
- Click on the Flare Clip and make sure you can see a toggle button on your clip in the timeline called 'Mode'. If you do not see this then please click the 'Toggle Switches / Modes' button that is in the bottom left of your program. This will open up the options to change the blend mode on your clips.
- Change the ‘Blend Mode’ to ‘Screen’.

Power Director
Lens Flares:
All you need to do is change the blend mode to 'Screen' to use Lens Flares.
Animated Elements:
We provide two file types with Animated Elements, MP4 H264 & Prores + Alpha.
Using Prores + Alpha:
Prores + Alpha files are not supported by Power Director.
Using MP4 H264:
All you need to do is change the blend mode to 'Screen' to use our MP4 Animated Elements.
How to change the blend mode:
play full video

LumaFusion
Lens Flares:
All you need to do is change the blend mode to 'Screen' to use Lens Flares.
Animated Elements:
We provide two file types with Animated Elements, MP4 H264 & Prores + Alpha.
Using Prores + Alpha:
Just drag & drop the elements into your timeline & that's it.
Prores mostly works in LumaFusion but some devices may have issues.
LumaFusion has some unusual requirements regarding device type and software. Please see more details here.
Using MP4 H264:
All you need to do is change the blend mode to 'Screen' to use our MP4 Animated Elements.
How to change the blend mode:
play full video

Edius
Animated Elements:
We provide two file types with Animated Elements, MP4 H264 & Prores + Alpha.
Using Prores + Alpha:
Just drag & drop the elements into your timeline & that's it.
Using MP4 H264:
All you need to do is change the blend mode to 'Screen' to use our MP4 Animated Elements.
Lens Flares:
All you need to do is change the blend mode to 'Screen' to use our Lens Flares.
How to change the blend mode:
play full video

Vegas Pro
Animated Elements:
We provide two file types with Animated Elements, MP4 H264 & Prores + Alpha.
Vegas Pro 18
For Vegas Pro 18 or newer, both file types are compatible.
Using Prores + Alpha:
Just drag & drop the elements into your timeline & that's it.
Using MP4 H264:
All you need to do is change the blend mode to 'Screen' to use our MP4 Animated Elements.
Vegas Pro 17 or earlier versions
For Vegas Pro 17 or earlier, you will need to use the MP4 H264 file type provided. Prores + alpha isn't compatible with Vegas.
Using Prores + Alpha:
Just drag & drop the elements into your timeline & that's it.
Using MP4 H264:
All you need to do is change the blend mode to 'Screen' to use our MP4 Animated Elements.
Lens Flares:
Please use the Prores file type provided.
How to use:
All you need to do is change the blend mode to 'Screen' to use our Lens Flares or Animated Elements. With Vegas Pro, you will need to change the track to 'Screen' rather than the individual clip.

Corel VideoStudio
Animated Elements:
We provide two file types with Animated Elements, MP4 H264 & Prores + Alpha.
For Corel, you will need to use the MP4 H264 file type provided. Prores + alpha isn't compatible with Corel.
Lens Flares:
Please follow the instructions below to use Lens Flares.
How to use:
All you need to do is change the blend mode to 'Screen' to use our Lens Flares or Animated Elements.
- In the Timeline, select an overlayed Lens Flare or Animated Element clip.
- In the 'Options' panel, click the 'Blending' tab.
- From the 'Blending Modes' drop-down menu, choose 'Screen'

Camtasia
Lens Flares:
Lens Flares are not compatible with Camtasia as you cannot change the blend mode.
Animated Elements:
We provide two file types with Animated Elements, MP4 H264 & Prores + Alpha.
For Camtasia, you will need to use the MP4 H264 file type provided. Prores + alpha isn't compatible with Camtasia.
How to use Animated Elements:
It's not possible to change the blend mode in Camtasia, but there is another method that works in a very similar way. You will need to use a 'Color Key' effect to remove the color black. Please see this tutorial below:
Video Tutorial
Pinnacle Studio
Lens Flares:
Lens Flares are not compatible with Pinnacle as you can't change the blend mode.
Animated Elements:
It's important to use the 4K versions if you run into issues with your software crashing. Pinnacle seems to struggle with 6K.
Using Prores + Alpha:
Just drag & drop the elements into your timeline & that's it.
Using MP4 H264:
Follow the instructions below.
How to use Animated Elements:
It's not possible to change the blend mode in Pinnacle, but there is another method that works in a very similar way. You will need to use the 'Luma Key' effect to remove the color black.
- Drag the chosen Element into your timeline above any clips you want to show the element on.
- Go to the 'Effects' panel and search for 'Luma Key'. Drag the Luma Key effect onto the Element.
- Open up the Clip Properties toggle as displayed in the video below.
- Go to the 'Effect' toggle and click it.
- Change the 'Luma Center' to '100'. Play around with these Luma settings until you get your desired result.
play full video

Hitfilm Express
Lens Flares:
You will need to change the blend mode to 'Screen'.
Animated Elements:
Using Prores + Alpha:
Just drag & drop the elements into your timeline & that's it.
Using MP4 H264:
You will need to change the blend mode to 'Screen' or remove the black background using a color keying effect.

Video Pad NHC
Animated Elements:
Using Prores + Alpha:
Just drag & drop the elements into your timeline & that's it.
Using MP4 H264:
It's not possible to change the blend mode in Video Pad.
Lens Flares:
It's not possible to change the blend mode so Lens Flares do not work in VideoPad.
ScreenFlow
Animated Elements:
Using Prores + Alpha:
Just drag & drop the elements into your timeline & that's it.
Using MP4 H264:
It's not possible to change the blend mode in Screenflow.
Lens Flares:
It's not possible to change the blend mode in Screenflow.
Movavi
Animated Elements:
Using Prores + Alpha:
Just drag & drop the elements into your timeline & that's it.
Using MP4 H264:
It's not possible to change the blend mode in Movavi.
Lens Flares:
It's not possible to change the blend mode, so Lens Flares do not work in Movavi.

Magix
Animated Elements:
Using Prores + Alpha:
Not compatible with Magix.
Using MP4 H264:
Use the 'Chroma Key' effect then press the 'Mix' button.
Lens Flares:
Use the 'Chroma Key' effect then press the 'Mix' button.

OBS Studio
Animated Elements:
Simply import the video files into your software. You need to use the Prores + Alpha file type for streaming software.

Streamlabs
Animated Elements:
Simply import the video files into your software. You need to use the Prores + Alpha file type for streaming software.
Tips & Tricks using Flares
We have a bunch of tips for using Lens Flares that could come in really handy for you. Take a look below and see if they spark any ideas!
- Using flares as luminance layers to transition titles. This means you can use the luminance of a flare and tell the software to only use the bright parts of the shots to essentially introduce the titles.
And you're done!
It's quite straight forward isn't it? This is how you set up your flares to use on your videos. Get those creative juices flowing!
Have a play! Oh yes and don’t forget to tag us using #bouncecolor on your social media when you use products hosted on our store.
Should you find yourself troubled with any of the above, fear not, we've got you! Just let us know and we will get you going in no time.
Have fun!