

How to add LUTs to Final Cut Pro X
Quick & Easy (2 Methods)
New & Updated 2021


Final Cut Pro X
Final Cut Pro X is Apple's native video editing app. Many Apple users tend to lean towards this rather than Premiere Pro or DaVinci Resolve, although both of these software work on Mac too. Final Cut is a great video editing program, but it does have limitations.
Final Cut tends to be quite difficult to use. It also uses a different style of editing timeline than other editing software. It's not widely as liked the way their timeline works as it's like a snap-on when you add videos. Other software you can place videos where ever you like in the timeline, but Final Cut only allows you to add on the end of the previous shot. Either way, it still has plenty of professional features, but not as much as Premiere Pro or DaVinci Resolve.
In case you are new to LUTs, LUTs are a quick and easy way to simplify the color grading process and help you get the best results for your work and better realise your vision. This tutorial will show you how you can install and use LUTs straight onto your editing software.
In this guide, you will find out how to install your LUTs in Final Cut Pro X (2 methods).
You will also find a tutorial on what camera settings to use when you shoot. This will help you get the best possible results when you transfer your footage on your desktop for editing and apply your LUTs.
Video shooting gear covered in the tutorial is for Blackmagic, DJI, Canon, GoPro, Sony, RED and Panasonic, as well as advice for all other cameras.
Important Guidelines Before Using LUTs
- Ensure white balance is correct when using LUTs! This will dramatically change the look of the LUT.
- Ensure your exposure is correct when using LUTs. You can use a histogram to help in camera or editing software.
- When using LUTs, your footage may need small adjustments to get optimal results, such as exposure, saturation, contrast, etc. depending on your preference.
- Shooting conditions such as lighting, weather, locations etc. can vary which can drastically affect a LUTs look. Some LUTs will work better in different scenarios. It’s best practice to experiment with which LUTs work best for your style and scenes.
Download a sample pack of our Creative LUTs here:
If you do not receive an email, please check your spam folder. If you still have not received it, then please contact us and we are always here to help.
View our LUTs CollectionHow to add LUTs to Final Cut Pro X (2 Methods):
Method 1
How to install LUTs Using Color Finale 2
This isn't compulsory but we highly recommend this incredible plugin to use our LUTs in Final Cut, it's called Color Finale 2. You can get a free trial to see how it works.
This add-on to Final Cut Pro X is a very high quality color grading plugin designed by film industry professionals. You can easily import and view LUTs, also it’s designed with the ability to customize your looks, using Color Finale's in-built color tools.
Color Finale has all the advanced tools that you will see in the likes of Davinci Resolve, some of which are: curves, mask tracking, film grain, in-built presets, LUT loader, color wheels and much more. The guys who created this plugin know exactly what they are doing and shine above all other color tools for Final Cut.


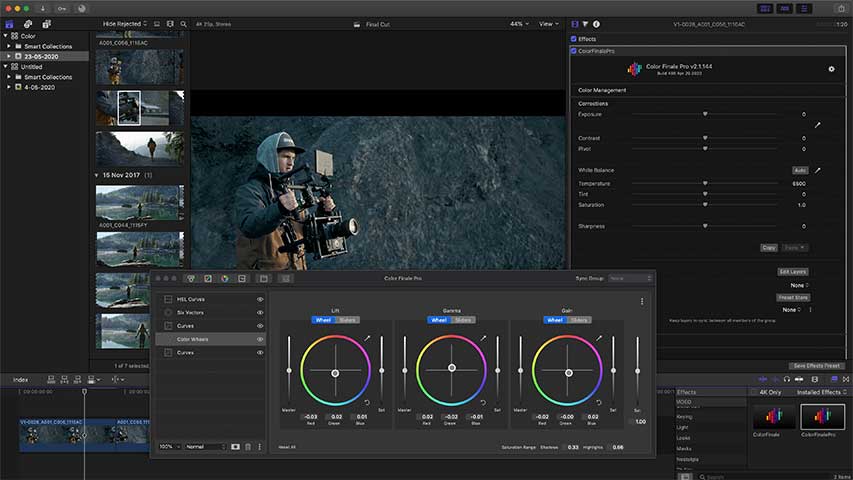

This is how to use Color Finale 2 LUT Management System
Method 2
How to install a LUT using Final Cut tools
This way is a simple quick 3 step process. Super easy to use LUTs.
- Open the ‘Effects’ Browser and click the ‘Color’ tab
- Drag and drop the ‘Custom LUT’ effect onto your footage in the timeline
- Select your footage
- Go to your 'Effects' panel and open the 'Custom LUT' settings
- Select the drop-down next. to 'LUT'
- Click on 'Choose custom LUT' and import your LUT
Note:
As every video is different (exposure, white balance, etc.), small adjustments are recommended to achieve an optimal result. Again, please ensure your White Balance is correct before applying a LUT. This can drastically change the LUTs look.
How to apply a LUT in FCPX in 10 seconds
Video tutorial
And you're done!
Now you can go ahead and get your favorite LUTs installed on your computer and apply them on your video footage to get the best out of your work. Get those creative juices flowing!
Should you find yourself troubled with any of the above, fear not, we've got you! Just let us know by contacting us and we will get you going in no time.
Have fun!